

How To Open Tux Paint In Windows 10
version 0.9.28
A simple drawing plan for children
Copyright © 2002-2022 past various contributors; see AUTHORS.txt.
https://tuxpaint.org/
@TuxPaintTweets on Twitter
Tux Pigment on Tumblr
June 4, 2022
| Table of Contents |
|---|
|
About Tux Paint
What Is "Tux Paint"?
Tux Paint is a free drawing program designed for young children (kids ages iii and up). It has a simple, easy-to-use interface, fun sound effects, and an encouraging drawing mascot who helps guide children as they use the program. Information technology provides a blank sail and a variety of drawing tools to aid your kid be creative.
License
Tux Paint is an Open Source project, Free Software released under the GNU Full general Public License (GPL). It is gratuitous, and the 'source lawmaking' behind the plan is available. (This allows others to add features, gear up bugs, and use parts of the program in their ain GPL'd software.)
Come across COPYING.txt for the full text of the GPL license.
Objectives
- Easy and Fun
- Tux Paint is meant to exist a simple drawing program for young children. It is not meant as a full general-purpose cartoon tool. It is meant to be fun and easy to use. Sound effects and a cartoon grapheme help let the user know what's going on, and keeps them entertained. In that location are also extra-big drawing-style mouse pointer shapes.
- Extensibility
- Tux Paint is extensible. Brushes and 'rubber stamp' shapes can be dropped in and pulled out. For instance, a teacher can drop in a drove of creature shapes and inquire their students to draw an ecosystem. Each shape can take a audio which is played, and textual facts which are displayed, when the child selects the shape.
- Portability
- Tux Paint is portable amidst various computer platforms: Windows, Macintosh, Linux, etc. The interface looks the same amid them all. Tux Paint runs suitably well on older systems, and can be built to run meliorate on ho-hum systems.
- Simplicity
- There is no straight access to the calculator's underlying intricacies. The electric current epitome is kept when the program quits, and reappears when information technology is restarted. Saving images requires no demand to create filenames or apply the keyboard. Opening an prototype is washed by selecting it from a drove of thumbnails. Admission to other files on the reckoner is restricted.
Using Tux Paint
Launching Tux Paint
Linux/Unix Users
Tux Paint should take placed a launcher icon in your KDE and/or GNOME menus, nether 'Graphics.'
Alternatively, you can run the post-obit command at a shell prompt (e.g., "$"):
$ tuxpaint If any errors occur, they will be displayed on the terminal (to STDERR).
Windows Users
![]()
Tux Paint
If you installed Tux Paint on your computer using the 'Tux Pigment Installer,' information technology will accept asked yous whether yous wanted a 'Kickoff' carte curt-cutting, and/or a desktop shortcut. If you agreed, you lot can simply run Tux Paint from the 'Tux Paint' department of your 'Start' carte du jour (e.g., under 'All Programs'), or past double-clicking the 'Tux Paint' icon on your desktop, if yous had the installer place one in that location.
If you're using the 'portable' (ZIP-file) version of Tux Pigment, or if you used the 'Tux Paint Installer,' but chose not to have shortcuts installed, you'll need to double-click the "tuxpaint.exe" icon in the "Tux Paint" binder on your estimator.
By default, the 'Tux Paint Installer' will put Tux Pigment's folder in "C:\Programme Files\", though you may have changed this when yous ran the installer.
If you used the 'ZIP-file' download, Tux Pigment's binder will be wherever you extracted the contents of the ZIP file.
macOS Users
Simply double-click the "Tux Pigment" icon.
![[Title screen]](https://tuxpaint.org/docs/en/html/../../html/images/tuxpaint-title.jpg)
Championship Screen
When Tux Paint first loads, a title/credits screen will appear.
Once loading is complete, press a key or click or tap in the Tux Paint window to continue. (Or, subsequently about 5 seconds, the title screen will go away automatically.)
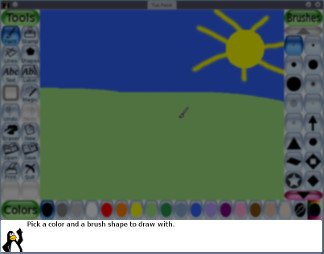
Primary Screen
The main screen is divided into the following sections:
- Left Side: Toolbar
-
The toolbar contains the drawing and editing controls.
- Middle: Drawing Sheet
-
The largest part of the screen, in the center, is the drawing canvas. This is, obviously, where yous draw!
💡 Note: The size of the drawing canvas depends on the size of Tux Paint. Yous can modify the size of Tux Paint using the Tux Pigment Config. configuration tool, or by other ways. Run into the Options documentation for more details.
- Right Side: Selector
-
Depending on the current tool, the selector shows different things. due east.g., when the Paint Brush or Line tool is selected, it shows the various brushes bachelor. When the Rubber Stamp tool is selected, it shows the different shapes you can apply. When the Text or Label tool is selected, it shows diverse fonts.
- Lower: Colors
-
When the active tool supports colors, a palette of colors choices will be shown near the bottom of the screen. Click one to choose a color, and information technology will be used past the active tool. (For case, the "Paint" tool will use information technology every bit the color to draw with the chosen brush, and the "Fill" tool volition use it as the color to use when overflowing-filling an surface area of the picture.)

On the far right are 3 special color options:
- Color Picker
The "colour picker" (which has an outline of an center-dropper) allows y'all to pick a colour found within your drawing.
(A shortcut key is bachelor to admission this feature quickly; see below.) - Rainbow Palette
The rainbow palette allows you to pick any color by choosing the hue, saturation, and value of the color you want. A box on the left displays hundreds of hues — from cherry-red at the top through to violet at the bottom — at hundreds of saturation/intensity levels — from stake & washed-out on the left through to pure on the right. A grey vertical bar provides admission to hundreds of value levels — from lighest at the top through to darkest at the lesser.
Click the green checkbox button to select the color, or the "Back" button to dismiss the popular-up without picking a new colour.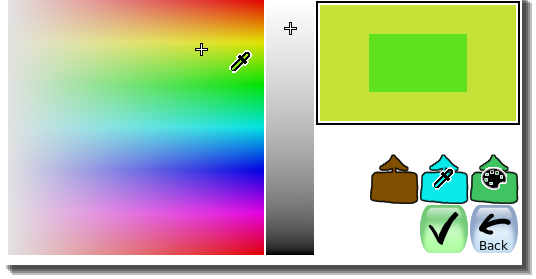
- Color Mixer
The "color mixer" (which has silhouette of a paint palette) allows you to create colors by blending primary condiment colors — red, yellowish, and blue — along with white (to "tint"), grey (to "tone"), and blackness (to "shade").
You lot may click whatever push multiple times (for example, red + red + yellow results in a ruddy-orange color). The ratios of colors added are shown at the bottom.
Yous can start over (reset to no colors in your movie) by clicking the "Clear" button. You tin besides disengage or redo multiple steps of mixing, in case you made a error (without having to get-go over).
Click the green checkbox push button to select the color, or the "Dorsum" button to dismiss the popular-up without picking a new color.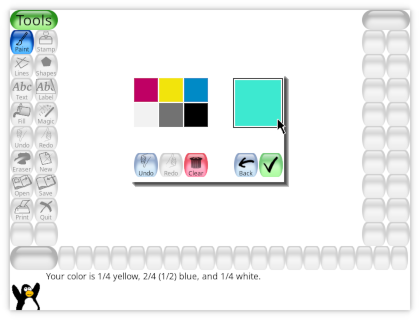
⌨ When the agile tool supports colors, a shortcut may be used to access the "color picker" option more quickly. Hold the
[Control]central while clicking, and the colour nether the mouse cursor will be shown at the bottom. You may drag around to canvass to find the color you desire. When you release the mouse button, the color under the cursor will be selected. If you release the mouse outside of the canvas (due east.one thousand., over the "Tools" area), the color selection will be left unchanged. (This is like to clicking the"Dorsum" button that's available when bringing upwardly the "color picker" pick via its button the colour palette.)⚙ Note: You can define your own colors for Tux Pigment. Run across the "Options" documentation.
- Color Picker
- Bottom: Help Area
-
At the very bottom of the screen, Tux, the Linux Penguin, provides tips and other data while yous use Tux Pigment.
![[Tools: Paint, Stamp, Lines, Shapes, Text, Magic, Label, Undo, Redo, Eraser, New, Open, Save, Print, Quit]](https://tuxpaint.org/docs/en/html/../../html/images/tools.jpg)
![[Canvas]](https://tuxpaint.org/docs/en/html/../../html/images/canvas.jpg)
![[Selectors - Brushes, Letters, Shapes, Stamps]](https://tuxpaint.org/docs/en/html/../../html/images/selector.jpg)
![[Colors - Black, White, Red, Pink, Orange, Yellow, Green, Cyan, Blue, Purple, Brown, Grey]](https://tuxpaint.org/docs/en/html/../../html/images/colors.jpg)
Drawing Tools
- "Paint" Tool (Brush)
-

The Paint Brush tool lets you draw freehand, using various brushes (called in the Selector on the right) and colors (called in the Color palette towards the lesser).
If yous hold the mouse button downward, and motion the mouse, it will draw equally you lot movement.
Some brushes are animated — they change their shape equally you draw them. A good example of this is the vines brush that ships with Tux Paint. These brushes volition have a minor "filmstrip" icon drawn on their Selector buttons.
Other brushes are directional — they will draw a different shape depending on what management you are painting with them. An example of this is the arrow brush that ships with Tux Paint. These brushes have a small 8-way arrow icon drawn on their Selector buttons.
Finally, some brushes can be both direction and blithe. Examples of this are the cat and squirrel brushes that ship with Tux Pigment. These brushes volition have both the "filmstrip" and viii-manner arrow icons.
As you draw, a sound is played. The bigger the brush, the lower the pitch.
Castor Spacing
The space between each position where a brush is applied to the canvas can vary. Some brushes (such every bit the footprints and flower) are spaced, past default, far enough apart that they don't overlap. Other brushes (such as the basic round ones) are spaced closely, so they make a continuous stroke.
The default spacing of brushes may exist overridden using by clicking within the triangular-shaped serial of bars at the lesser right; the larger the bar, the wider the spacing. Brush spacing affects both tools that utilize the brushes: the "Paint" tool and the "Lines" tool.

⚙ Note: If the "
nobrushspacing" option is ready, Tux Paint won't brandish the brush spacing controls. See the "Options" documentation. - "Stamp" Tool (Rubber Stamps)
-

The Stamp tool is like a ready of rubber stamps or stickers. It lets you paste pre-fatigued or photographic images (similar a picture of a horse, or a tree, or the moon) in your picture.
Equally you movement the mouse around the canvass, an outline follows the mouse, showing where the stamp will be placed, and how big information technology will exist. Click to place the stamp.

At that place can exist numerous categories of stamps (e.1000., animals, plants, outer space, vehicles, people, etc.). Use the Left and Correct arrows near the bottom of the Selector to cycle through the collections.
Prior to 'stamping' an image onto your drawing, various effects tin can sometimes exist applied (depending on the stamp):
- Some stamps tin be colored or tinted. If the colour palette beneath the sail is activated, you can click the colors to modify the tint or color of the stamp earlier placing it in the picture.
- Stamps can be shrunk and expanded, by clicking inside the triangular-shaped series of confined at the lesser right; the larger the bar, the larger the stamp will appear in your picture.
- Many stamps may be flipped vertically, or displayed as a mirror-image, using the control buttons at the bottom right.


Different stamps tin can have different audio effects and/or descriptive (spoken) sounds. Buttons in the Help Surface area at the lower left (near Tux, the Linux penguin) allow you to re-play the sound effects and descriptive sounds for the currently-selected postage stamp.
⚙ Note: If the "
nostampcontrols" option is gear up, Tux Pigment won't display the Mirror, Flip, Compress and Grow controls for stamps. Run into the "Options" documentation. - "Lines" Tool
-

This tool lets you draw straight lines using the various brushes and colors you usually use with the Paint Brush.
Click the mouse and hold it to choose the starting point of the line. As you move the mouse around, a sparse 'rubber-band' line will show where the line volition be drawn. At the bottom, you lot'll run into the angle of your line, in degrees. A line going directly to the right is 0°, a line going straight up is ninety°, a line going straight left is 180°, a line going straight down is 270°, so on.
Let become of the mouse to complete the line. A "sproing!" audio volition play.
Some brushes are blithe, and volition prove a pattern of shapes along the line. Others are directional, and will show a different shape depending on the angle of the castor. And finally some are both animated and directional. Run across "Paint", above, to learn more than.
Different brushes take different spacing, leaving either a series of private shapes, or a continuous stroke of the brush shape. Castor spacing may exist adapted. See "Paint", above, to learn more.
- "Shapes" Tool
-

This tool lets you lot depict some simple filled, and un-filled shapes.
Select a shape from the selector on the right (circle, square, oval, etc.).
Use the options at the bottom right to cull the shape tool's beliefs:
- Shapes from centre
- The shape will expand from where yous initially clicked, and will be centered around that position.
📜 This was Tux Paint's only behavior through version 0.nine.24.)
- Shapes from corner
- The shape will extend with one corner starting from where you initially clicked. This is the default method of most other traditional drawing software.
📜 This choice was added starting with Tux Paint version 0.9.25.)
⚙ Notation: If shape controls are disabled (east.thousand., with the "
noshapecontrols" option), the controls volition not exist presented, and the "shapes from middle" method volition be used.In the sail, click the mouse and concord information technology to stretch the shape out from where you clicked. Some shapes tin change proportion (e.yard., rectangle and oval may be wider than alpine, or taller than wide), others cannot (eastward.chiliad., foursquare and circle).
For shapes that tin alter proportion, the aspect ratio of the shape volition exist shown at the bottom. For example: "1:i" will be shown if information technology is "square" (as tall as it is wide); "2:ane" if it is either twice as wide equally it is tall, or twice as alpine as it is broad; and so on.
Let go of the mouse when you're washed stretching.
- Normal Shapes Style
-
At present you tin move the mouse around the canvas to rotate the shape. The bending your shape is rotated will be shown at the bottom, in degrees (similar to the "Lines" tool, described higher up).
Click the mouse push button once more and the shape will be drawn in the current colour.
- Simple Shapes Way
- If the "unproblematic shapes" pick is enabled, the shape will exist drawn on the sail when you lot let get of the mouse button. (There'due south no rotation step.)
⚙ Run across the "Options" documentation to learn about the "unproblematic shapes" ("
simpleshapes") choice.
- "Text" and "Label" Tools
-

Choose a font (from the 'Letters' available on the right) and a color (from the color palette virtually the lesser). You lot may also apply a bold, and/or an italic styling issue to the text. Click on the screen and a cursor volition appear. Type text and it will testify up on the screen. (You can change the font, color, and styling while entering the text, before it is applied to the sheet.)
Press
[Enter]or[Return]and the text will be drawn onto the picture and the cursor will move down one line.Alternatively, printing
[Tab]and the text volition be drawn onto the picture, but the cursor volition motion to the right of the text, rather than down a line, and to the left. (This can exist useful to create a line of text with mixed colors, fonts, styles and sizes.)Clicking elsewhere in the picture while the text entry is notwithstanding active causes the current line of text to move to that location (where you tin continue editing information technology).
- "Text" versus "Label"
-
The Text tool is the original text-entry tool in Tux Paint. Text entered using this tool can't be modified or moved afterwards, since it becomes part of the cartoon. Even so, because the text becomes part of the movie, it can be drawn over or modified using Magic tool furnishings (e.g., smudged, tinted, embossed, etc.)
When using the Label tool (which was added to Tux Paint in version 0.9.22), the text 'floats' over the image, and the details of the label (the text, the position of the characterization, the font choice and the color) get stored separately. This allows the characterization to be repositioned or edited later.
To edit a label, click the characterization selection button. All labels in the cartoon will appear highlighted. Click one — or employ the
[Tab]key to cycle through all the labels, and the[Enter]or[Render]key to select i — and you may then edit the characterization. (Utilise they[Backspace]key to erase characters, and other keys to add text to the label; click in the canvas to reposition the label; click in the palette to change the color of the text in the label; etc.)Yous may "utilize" a label to the canvas, painting the text into the picture equally if it had been added using the Text tool, past clicking the characterization application button. (This feature was added in Tux Pigment version 0.ix.28.) All labels in the cartoon will announced highlighted, and yous select one just as you practise when selecting a label to edit. The chosen label will be removed, and the text will be added straight to the canvas.
⚙ The Label tool tin can be disabled (e.g., by selecting "Disable 'Label' Tool" in Tux Paint Config. or running Tux Paint with the "
nolabel" option). - International Character Input
-
Tux Paint allows inputting characters in different languages. Near Latin characters (A-Z, ñ, è, etc.) tin can by entered directly. Some languages require that Tux Paint be switched into an alternating input manner before entering, and some characters must exist equanimous using numerous keypresses.
When Tux Pigment's locale is fix to ane of the languages that provide alternating input modes, a key is used to bike through normal (Latin graphic symbol) and locale-specific fashion or modes.
Currently supported locales, the input methods bachelor, and the key to toggle or bike modes, are listed beneath.
- Japanese — Romanized Hiragana and Romanized Katakana — right
[Alt]key or left[Alt]key - Korean — Hangul 2-Bul — right
[Alt]key or left[Alt]primal - Traditional Chinese — right
[Alt]cardinal or left[Alt]key - Thai — right
[Alt]key
💡 Note: Many fonts exercise not include all characters for all languages, and then sometimes yous'll demand to change fonts to see the characters you're trying to blazon.
- Japanese — Romanized Hiragana and Romanized Katakana — right
- On-screen Keyboard
-
An optional on-screen keyboard is available for the Text and Label tools, which can provide a variety of layouts and character limerick (e.g., composing "a" and "eastward" into "æ").
⚙ See the "Options" and "Extending Tux Paint" documentation for more information.
- "Fill" Tool
-

The 'Fill' tool 'flood-fills' a contiguous area of your cartoon with a color of your choice. Three make full options are offered:
- Solid — click once to fill an area with a solid colour.
- Brush — click and drag to fill an expanse with a solid color using freehand painting.
- Linear — click so drag to fill the area with color that fades away (a gradient) towards where you drag the mouse.
- Radial — click once to fill an expanse with a colour that fades away (a slope) radially, centered on where you clicked.
📜 Note: Prior to Tux Paint 0.9.24, "Make full" was a Magic tool (run into below). Prior to Tux Pigment 0.ix.26, the "Fill" tool just offered the 'Solid' method of filling.
- "Magic" Tool (Special Effects)
-

The Magic tool is actually a set of special tools. Select ane of the 'magic' effects from the selector on the correct. Then, depending on the tool, you tin can either click and elevate around the picture, and/or merely click the moving-picture show in one case, to apply the effect.
If the tool can be used past clicking and dragging, a 'painting' button will be available on the left, below the listing of Magic tools on the right side of the screen. If the tool tin can touch the entire flick at one time, an 'unabridged picture' push button will exist available on the correct.
See the instructions for each Magic tool (in the 'magic-docs' binder).
- "Eraser" Tool
-

This tool is similar to the Paint Castor. Wherever y'all click (or click and drag), the picture will be erased. (This may be white, some other color, or to a background film, depending on the picture.)
A number of eraser sizes are available, both round and square.
Every bit you move the mouse effectually, a foursquare outline follows the arrow, showing what function of the picture will be erased to white.
As y'all erase, a 'squeaky clean' eraser wiping sound is played.
Other Controls
- "Undo" and "Redo" Commands
-


Clicking the "Disengage" button will undo (revert) the concluding drawing activeness. You tin can even disengage more than once!
⌨ Note: You can also printing
[Command / ⌘]+[Z]on the keyboard to Undo.Clicking the "Redo" button will redo the cartoon activity y'all just un-did via the "Undo" control.
As long every bit y'all don't draw again, you can redo every bit many times as you had undone!
⌨ Note: You lot can too press
[Control / ⌘]+[R]on the keyboard to Redo. - "New" Command
-

Clicking the 'New' button will start a new drawing. A dialog will appear where you may cull to start a new picture using a solid background colour, or using a 'Starter' or 'Template' image (see below). You will offset exist asked whether you really want to do this.
⌨ Annotation: You tin can also press
Special Solid Background Color Choices[Command / ⌘]+[Northward]on the keyboard to first a new drawing.
'Starter' & Template ImagesForth with the preset solid colors, you tin also choose colors using a rainbow palette or a "color mixer". These operate identically to the options institute in the color palette shown below the canvas when drawing a picture. Run into Main Screen > Lower: Colors > Special colour options for details.
'Starters' tin can carry like a folio from a coloring book — a black-and-white outline of a picture, which you can so color in, and the blackness outline remains intact — or similar a 3D photograph, where you draw in between a foreground and groundwork layer.
'Templates' are similar, but but provide a background drawing to work off of. Different 'Starters', there is no layer that remains in the foreground of anything you draw in the picture.
When using the 'Eraser' tool, the original epitome from the 'Starter' or 'Template' will reappear. The 'Flip' and 'Mirror' Magic tools affect the orientation of the 'Starter' or 'Template', too.
When you load a 'Starter' or 'Template', draw on it, so click 'Save,' it creates a new picture file — information technology doesn't overwrite the original, so you can use it once again later (by accessing information technology from the 'New' dialog).
- "Open up" Command
-

This shows you a list of all of the pictures you've saved. If there are more than than can fit on the screen, use the upwardly and down arrows at the top and bottom of the list to ringlet through the list of pictures.
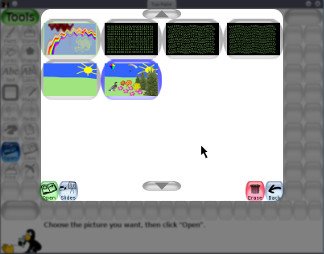
Click a moving picture to select it, and then...
-

Click the light-green 'Open' push button at the lower left of the list to load the selected picture.
(Alternatively, you tin can double-click a motion-picture show'due south icon to load it.)
💡 If choose to open a picture, and your electric current cartoon hasn't been saved, you will be prompted every bit to whether you want to save it or non. (Meet "Salve," below.)
-

Click the brown 'Erase' (trash can) button at the lower correct of the list to erase the selected moving picture. (You will be asked to confirm.)
📜 Annotation: On Linux (every bit of version 0.9.22) and Windows (as of version 0.9.27), the motion picture will be placed in your desktop's trash tin / recycle bin (where you may recover and restore it, if yous change your mind).
-

Click the 'Export' button near the lower correct to export the paradigm to your consign folder. (e.k., "
~/Pictures/TuxPaint/")
From the "Open up" screen you can likewise:
-

Click the blueish 'Slides' (slide projector) button at the lower left to go to slideshow mode. Meet "Slides", beneath, for details.
-

Click the reddish 'Back' arrow push button at the lower right of the list to cancel and render to the flick you were cartoon.
⌨ Note: You can too press
[Command / ⌘]+[O]on the keyboard to bring up the 'Open' dialog. -
- "Save" Control
-

This saves your current picture.
If you oasis't saved information technology before, it will create a new entry in the list of saved images. (i.eastward., information technology will create a new file)
💡 Notation: Information technology won't ask you anything (e.one thousand., for a filename). It will simply relieve the picture, and play a "camera shutter" audio effect.
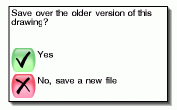
If you have saved the film before, or this is a motion picture you simply loaded using the "Open" command, you will first be asked whether you lot desire to save over the erstwhile version, or create a new entry (a new file).
⚙ Note: If either the "
saveover" or "saveovernew" options are set, information technology won't enquire before saving over. See the "Options" documentation.⌨ Note: You can also press
[Control / ⌘]+[Southward]on the keyboard to save. - "Print" Command
-

Click this button and your picture will be printed!
On nigh platforms, you can also concur the
[Alt]key (called[Option]on Macs) while clicking the 'Print' push to become a printer dialog. Note that this may not piece of work if you're running Tux Paint in fullscreen mode. See below.- Disabling Printing
-
The "
noprint" option can exist set, which volition disable Tux Pigment'due south 'Print' button.⚙ Encounter the "Options" documentation.
- Restricting Printing
-
The "
printdelay" option can be set, which will only allow occasional printing — in one case every so many seconds, as configured by you.For example, with "
printdelay=60" in Tux Paint'south configuration file, printing can but occur once per infinitesimal (60 seconds).⚙ See the "Options" documentation.
- Press Commands
-
(Linux and Unix but)
Tux Paint prints past generating a PostScript representation of the drawing and sending it to an external plan. By default, the program is:
lprThis command tin can be changed by setting a "
printcommand" option in Tux Pigment'south configuration file.An culling impress command tin can be invoked by holding the "
[Alt]" cardinal on the keyboard while clicking clicking the 'Impress' push, equally long as you're not in fullscreen mode, an culling program is run. By default, the program is KDE's graphical impress dialog:kprinterThis control can exist inverse by setting a "
altprintcommand" option in Tux Pigment's configuration file.⚙ Come across the "Options" documentation.
- Printer Settings
-
(Windows and macOS)
Past default, Tux Paint but prints to the default printer with default settings when the 'Print' button is pushed.
However, if you lot hold the
[Alt](or[Option]) key on the keyboard while clicking the 'Print' push button, as long every bit you're not in fullscreen fashion, your operating system's printer dialog will appear, where y'all can change the settings.You tin can take the printer configuration changes stored betwixt Tux Paint sessions past setting the "
printcfg" option.If the "
printcfg" choice is used, printer settings will be loaded from the file "printcfg.cfg" in your personal folder (see below). Any changes will exist saved there too.⚙ See the "Options" documentation.
- Printer Dialog Options
-
By default, Tux Paint only shows the printer dialog (or, on Linux/Unix, runs the "
altprintcommand"; e.k., "kprinter" instead of "lpr") if the[Alt](or[Option]) central is held while clicking the 'Impress' button.Yet, this behavior can be changed. You can have the printer dialog always appear by using "
--altprintalways" on the command-line, or "altprint=always" in Tux Paint'due south configuration file. Conversely, you can prevent the[Alt]/[Option]central from having any result by using "--altprintnever", or "altprint=never".⚙ See the "Options" documentation.
- "Slides" Control (under "Open")
-
The 'Slides' button is available in the 'Open' dialog. It can be used to play a simple animation within Tux Paint, or a slideshow of pictures. It tin also consign an animated GIF based on the chosen images.
- Chosing pictures
-
When you enter the 'Slides' section of Tux Paint, it displays a list of your saved files, simply like the 'Open' dialog.
Click each of the images you wish to display in a slideshow-way presentation, one by ane. A digit will appear over each epitome, letting you know in which guild they will exist displayed.
You can click a selected image to unselect it (accept it out of your slideshow). Click it again if you wish to add it to the end of the listing.
- Set up playback speed
-
A sliding scale at the lower left of the screen (adjacent to the 'Play' button) can be used to adjust the speed of the slideshow or animated GIF, from slowest to fastest. Choose the leftmost setting to disable automatic advancement during playback inside Tux Paint — you volition demand to press a key or click to go to the next slide (run across below).
💡 Notation: The slowest setting does non automatically advance through the slides. Use it for when yous want to stride through them manually. (This does not apply to an exported animated GIF.)
- Playback in Tux Paint
-
To play a slideshow within Tux Paint, click the 'Play' button.
💡 Note: If you hadn't selected any images, then all of your saved images will exist played in the slideshow!
During the slideshow, press
[Infinite],[Enter]or[Return], or the[Right pointer]— or click the 'Adjacent' button at the lower left — to manually advance to the adjacent slide. Printing[Left pointer]to get back to the previous slide.Printing
[Escape], or click the 'Back' button at the lower correct, to get out the slideshow and return to the slideshow epitome pick screen. - Exporting an animated GIF
-
 Click the 'GIF Export' button near the lower right to have Tux Pigment generate an blithe GIF file based on the selected images.
 💡 Note: At least two images must be selected. (To export a single image, use the 'Export' option from the main 'Open' dialog.) If no images are selected, Tux Paint will not endeavor to generate a GIF based on all saved images.
Pressing
[Escape]during the export process will abort the process, and return you to the 'Slideshow' dialog.
Click 'Back' in the slideshow image selection screen to return to the 'Open' dialog.
- "Quit" Command
-

Clicking the 'Quit' push button, closing the Tux Paint window, or pushing the
[Escape]key will quit Tux Paint.You lot will showtime be prompted as to whether you really want to quit.
If yous choose to quit, and you haven't saved the current picture, you will first be asked if wish to save it. If it's not a new image, yous will and then be asked if you want to salve over the old version, or create a new entry. (See "Salve" above.)
⚙ Notation: If the image is saved, it will be reloaded automatically the adjacent time you lot run Tux Pigment -- unless the "
startblank" option is ready.⚙ Note: The 'Quit' button within Tux Paint, and quitting via the
[Escape]key, may be disabled, via the "noquit" option.In that case, the "window close" button on Tux Pigment'due south title bar (if non in fullscreen mode) or the
[Alt]+[F4]central sequence may be used to quit.If neither of those are possible, the key sequence of
[Shift]+[Command / ⌘]+[Escape]may exist used to quit.⚙ See the "Options" documentation.
- Audio Muting
-
There is no on-screen control push button at this time, just by using the
[Alt]+[South]keyboard sequence, audio effects can be disabled and re-enabled (muted and unmuted) while the programme is running.Note that if sounds are completely disabled via the "
nosound" option, the[Alt]+[S]key combination has no effect. (i.e., it cannot be used to turn on sounds when the parent/teacher wants them disabled.)⚙ See the "Options" documentation.
Loading Other Pictures into Tux Pigment
Tux Paint's 'Open' dialog only displays pictures you created with Tux Pigment. So what do you practice if you want to load another drawinng or fifty-fifty a photograph into Tux Paint, so you lot can edit or depict on it?
You lot can just convert the pic to the format Tux Paint uses — PNG (Portable Network Graphic) — and identify information technology in Tux Pigment'south "saved" directory/binder. Here is where to notice it (by default):
- Windows 10, eight, 7, Vista
- Inside the user's "
AppData" folder, e.g.: "C:\Users\username\AppData\Roaming\TuxPaint\saved\". - Windows 2000, XP
- Within the user's "
Application Data" binder, e.m.: "C:\Documents and Settings\username\Awarding Data\TuxPaint\saved\". - macOS
- Inside the user's "
Library" folder, east.one thousand.: "/Users/username/Library/Application Support/Tux Paint/saved/". - Linux/Unix
- Inside a hidden "
.tuxpaint" directory, in the user's home directory ("$HOME"), e.thou. "/home/username/.tuxpaint/saved/".
💡 Note: Information technology is too from this folder that you can copy or open pictures drawn in Tux Pigment using other applications, though the 'Export' pick from Tux Paint's 'Open' dialog can be used to copy them to a location that's easier and safer to access.
Using the import script, "tuxpaint-import"
Linux and Unix users tin can utilize the "
tuxpaint-import" crush script which gets installed when yous install Tux Paint. It uses some NetPBM tools to catechumen the image ("anytopnm"), resize it and so that it will fit in Tux Pigment'south canvas ("pnmscale"), and convert it to a PNG ("pnmtopng").It also uses the "
date" command to get the current time and date, which is the file-naming convention Tux Paint uses for saved files. (Call back, you are never asked for a 'filename' when yous become to save or open pictures!)To use this script, just run it from a command-line prompt, and provide it the proper noun(s) of the file(s) you lot wish to catechumen.
They will be converted and placed in your Tux Pigment "
saved" directory.💡 Notation: If you're doing this for a different user (due east.g., your kid) you lot'll demand to make sure to run the control under their business relationship.)
Example:
$              tuxpaint-import grandma.jpg
              grandma.jpg ->       /home/username/.tuxpaint/saved/20211231012359.png
              jpegtopnm: WRITING A PPM FILE
The first line ("
tuxpaint-import grandma.jpg") is the command to run. The post-obit two lines are output from the programme while it'southward working.Now you can load Tux Pigment, and a version of that original motion-picture show will be available under the 'Open' dialog. Just double-click its icon!
Importing Pictures Manually
Windows, macOS, and Haiku users who wish to import arbitrary images into Tux Paint must do so via a manual procedure.
Load a graphics program that is capable of both loading your picture and saving a PNG format file. (See the documentation file "PNG.html" for a list of suggested software, and other references.)
When Tux Paint loads an image that's not the same size as its drawing sheet, information technology scales (and sometimes smears the edges of) the paradigm then that it fits within the canvas.
To avoid having the image stretched or smeared, yous tin can resize it to Tux Paint'south canvas size. This size depends on the size of the Tux Pigment window, or resolution at which Tux Paint is run, if in fullscreen. (Annotation: The default resolution is 800x600.) Encounter "Computing Paradigm Dimensions", below.
Save the picture in PNG format. It is highly recommended that yous proper name the filename using the current engagement and time, since that's the convention Tux Paint uses:
YYYYMMDDhhmmss.png
YYYY= YrMM= Calendar month (two digits, "01"-"12")DD= Day of calendar month (two digits, "01"-"31")HH= Hr (2 digits, in 24-hr format, "00"-"23")mm= Minute (ii digits, "00"-"59")ss= Seconds (two digits, "00"-"59")Case: "
20210731110500.png", for July 31, 2021 at 11:05am.Identify this PNG file in your Tux Pigment "
saved" directory/folder. (Run across in a higher place.)Calculating Paradigm Dimensions
This part of the documentation needs to exist rewritten, since the new "
buttonsize" option was added. For at present, try cartoon and saving an image within Tux Paint, then determine what size (pixel width and height) information technology came out to, and endeavor to lucifer that when scaling the movie(due south) you're importing into Tux Paint.
Farther Reading
Other documentation included with Tux Paint (found in the "docs" binder/directory) includes:
- Using Tux Paint:
-
- OPTIONS.html
Detailed instructions on control-line and configuration-file options, for those who don't want to use the Tux Paint Config. tool to manage Tux Pigment'southward configuration. - 'Magic' Tool Documentation ("
magic-docs")
Documentation for each of the currently-installed 'Magic' tools.
- OPTIONS.html
- How to extend Tux Paint:
-
- EXTENDING.html
Detailed instructions on extending Tux Pigment: creating brushes, stamps, starters, and templates; adding fonts; and creating new on-screen keyboard layouts and input methods. - PNG.html
Notes on creating PNG format bitmapped (raster) images for use in Tux Pigment. - SVG.html
Notes on creating SVG format vector images for use in Tux Paint.
- EXTENDING.html
- Technical information:
-
- INSTALL.html
Instructions for compiling and installing Tux Paint, when applicable. - SIGNALS.html
Information well-nigh the POSIX signals that Tux Paint responds to.
- INSTALL.html
- Evolution history and license:
-
- AUTHORS.txt
List of authors and contributors. - CHANGES.txt
Summary of what has changed between releases of Tux Paint. - COPYING.txt
Tux Pigment's software license, the GNU Full general Public License (GPL)
- AUTHORS.txt
How to Get Help
If you need help, there are numerous ways to interact with Tux Paint developers and other users:
- Written report bugs or request new features via the project'south bug-tracking organization
- Participate in the diverse project mailing lists
- Contact the developers directly
To learn more, visit the "Contact" page of the official Tux Paint website: https://tuxpaint.org/contact/
How to Participate
Tux Paint is a volunteer-driven project, and we're happy to have your aid in a variety of ways:
- Interpret Tux Paint to some other language
- Better existing translations
- Create artwork (stamps, starters, templates, brushes)
- Add or ameliorate features or magic tools
- Create classroom curriculum
- Promote or aid support others using Tux Paint
To learn more, visit the "Help Us" page of the official Tux Pigment website: https://tuxpaint.org/help/
Source: https://tuxpaint.org/docs/en/html/README.html
Posted by: coolidgetherintord.blogspot.com
0 Response to "How To Open Tux Paint In Windows 10"
Post a Comment